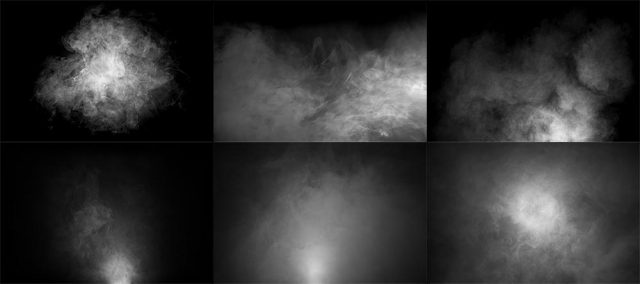
Free Smoke Textures
Recently I’ve run a couple of workshops that used smoke effects, the Music and Magic workshop was a great example. During the workshops I’ve mentioned that the volume of smoke can easily be enhanced with a little help from Photoshop. All you need is a shot of smoke against a black background and you’re good to go. Of course there’s smoke and then there’s smoke, so what you actually need is a library of various smoke patterns in order to match it to your scene.
To kick off your smoke collection I’m sharing 6 of my smoke shots as a Friday Freebie. You can download them from here:
https://drive.google.com/open?id=0B_Mmmm3K1utNam9wUk9yUFpVdEk
Please read the usage rules below.
How To Add Smoke
There’s a several ways to use my smoke textures but first you need to download and unzip them. In Photoshop simply open a smoke image and select it (CTRL+A). Then copy it (CTRL+C) and go to the image that needs smoke and paste it in (CTRL+V). To blend the smoke into the photo go to the Layers Panel and change the Layer Blending mode from Normal to Screen. Of course it’s unlikely that the smoke will be in the right place or even the right size, so press CTRL+T and use the Free Transform handles to resize the smoke and then drag it around as you need.
How you use the smoke in your photography is up to you but you. It can be used as realistic smoke by following the advice above or it can be more mist like by lowering the opacity and applying some Gaussian Blur. Alternatively you could add it to the whole image and use it as a texture, may be add some colour with CTRL+U (Hue/Saturation) or try different blending modes for interesting and unexpected results.
- With Added Smoke
- Original Image
- With Smoke As A Texture
- Original Image
If you create a photo using the Friday Freebie then let me (and everyone else) know by leaving the link in the comments below.
Usage rules
The images are copyright Gavin Hoey 2017. Use is limited to any personal but non-commercial purposes. Please share the Friday Freebie by linking back to this page. Do not redistribute the original images without my permission.
Download instructions
1. Click on the correct download link below (no sign up is needed)
https://drive.google.com/open?id=0B_Mmmm3K1utNam9wUk9yUFpVdEk


Cool thanks Gav
thank you : )
Thank you, Mr. Gavin, greetings from Serbia!
Many thanks Sir Gavin, they will come in very handy…
Thanks a lot,
Gavin!
Thank you and I love looking at your videos that are expalined in a simple and brillant way.
Thank you so much!
Thanks man! Every time I watch one of your video tutorials I learn something new and get fueled up with creativity.
thank you Gavin
Thanks Gavin, you always inspire me.
Thank you Gavin, works well.
cheers Phil.
Thanks a lot Gavin..??
Thanks, Gavin. I love your photo work and your tutorials on YouTube.
Here’s something I did with one of the smoke textures.
https://flic.kr/p/23qHKE1
My Fav Photographer! Makes everything seems so easy…Keep up the good work, Gavin. When you’re in NY again, I’ll come to your seminar.
I wish I could come too.. 😀
Thanks Gavin, although I have been a professional photogra
pher,I admire Your work.
Thank you very much Mr. Gavin 🙂
In your red riding hood balancing flash with ambient light, were you metering the background or models face?
Hi Chaz. I get the camera to meter for the background (and then I deliberately under exposure the background for effect) I then use a flash meter to get the flash to match the camera settings. So background is under exposed (ambient light) but models face is correctly exposed (flash). It’s way more confusing to describe then to do 😉
Thank you Gav!!
Thank you for the F-Stop Chart,Very useful great idea.
Many thanks, just what I needed.
Working on a fantasy photo of Mom and warrior child fighting a favourite dinosaur toy! This adds just the right atmosphere! Much appreciated.
Thank you so much!
Thanks Sir, I always love your videos and enjoy learning through them
Thank you for the smoke.