5 times your camera meter will be wrong
Camera metering systems are pretty amazing and I’m usually very happy for the evaluative metering systems in my cameras to figure out the exposure and leave me to get on with sorting the composition.
But no matter how smart modern metering systems become, there are still times when they can get fooled, so here’s 5 times you might want to ignore what the camera tells you and go your own way.
1: Light coloured subjects
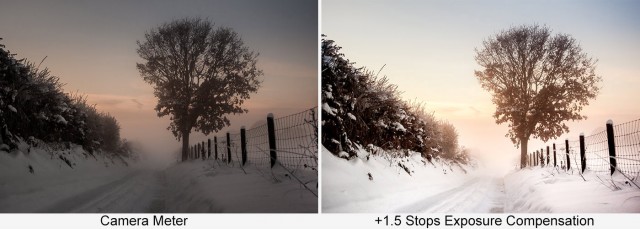 White in a photo looks amazing especially when it’s clean and pristine. The trouble starts when there are lots of white or light colours in your shot. Why? Because cameras assume that most photos average out to a middle grey tone. Whilst that’s more or less true most of the time, large amounts of bright colours can fool the meter into under exposing and making your photos darker than expected
Solution: Dial in positive exposure compensation
2: Dark subjects
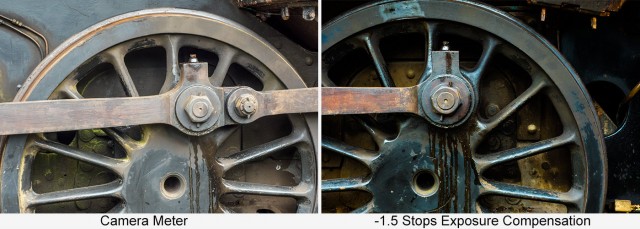 The other side of the coin is also true. Dark, low key subjects will become artificially bright (over exposure) if the meter is left to its own devices. Just like with light tones, the more dark tones you have in the shot, the more incorrect your meter will become.
Solution: Dial in negative exposure compensation
3: Off camera Flash
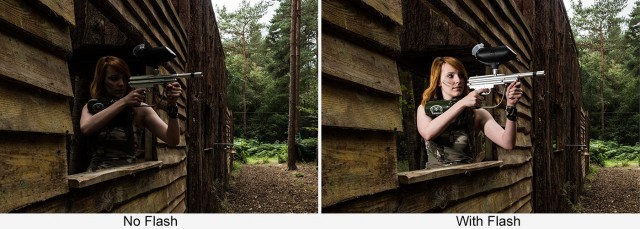 Camera meters work great with ambient light but flash is a very different animal. If you have a dedicated speedlight attached to the cameras hotshoe, then things generally go well but take the flash off the camera and you’ll find yourself on your own for metering. Put simply, the flash of light is way too short a time for the cameras meter to measure the light.
Solution: Switch to manual mode and use a flash meter
4: Long Exposure with ND Filters
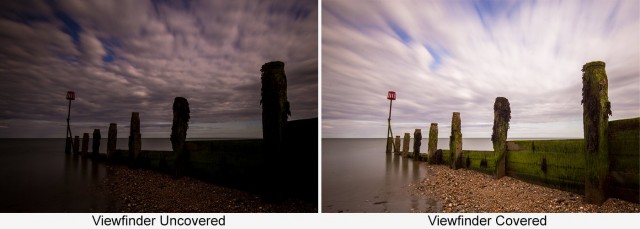 Super dark 9 and 10 stop Neutral Density filters can push shutters speeds to extreme lengths and create amazing eye catching shots, they can also cause exposure issues. This problem is confined to DSLR shooters and happens because light can leak back through the viewfinder bounce off the mirror and cause an exposure error.
Solution: Cover the viewfinder… or go mirrorless!
5: Back light
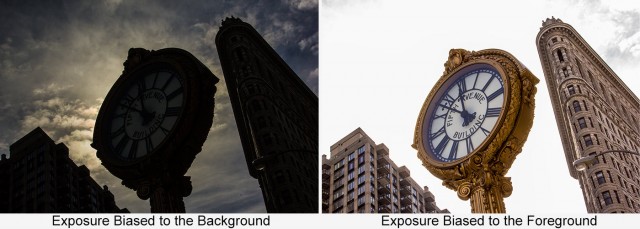 This is where random things can happen. Picture the scene. You have a background that’s brighter than your subject, perhaps it’s a building against the sky. One of two things can happen if you let the meter do its own thing. Either you get detail in the sky and the buildings go black or you get detail in the buildings and the sky goes white. Murphy’s Law dictates whichever happens you wanted the opposite.
Solution 1: Dial in positive exposure compensation if you want more detail from the shadows
Solution 2: Dial in negative exposure compensation if you want more detail from the highlights


Hi gavin,
im following you for almost a year. i wanted to know about zoom in speedlight . and what matters with zoom range in speedlight. im using youngnuo 560 mark iV.
Zooming the flash focuses the light making it a bit brighter and reducing the spread. If using a softbox, umberella or grid I always work at 24mm zoom.
Thank you Gavin. i have tried many things from you but im not getting the result. im using canon1200d with 50 1.8. and youngnuo 560 mark iV (2) i always tried with 1/64 power in speelight..
can u make a video with canon 1200d with 50 1,8, youngnuo flashes please..
Thank you gavin. your great !!
I think in the last scenario there is a third solution, HDR…
That would work, although you might also want a silhouette or hi-key shot 🙂
Thanks Gavin, great tutorial is of great help. In few lines you explained how to manage exposure compensation…
Could you suggest the use exposure compensation only in outside situation or even in studio with flashes/continuos light?
Thanks ^^
Hi Gavin,
Thank you for spread the knowledge, I watch all your videos in you tube and the last episode: Five questions about flash meter, helped me to understand a lot but I have one question: how to use a flash meter with ND filters? I know is a few resources in the net but will be nice to see you explain your way. Thank you.
Hi, Just wonder why when you are using flash/strobes outside mostly you take an ambient light reading with the camera meter then you take a reading for the flash/strobe with the Sekonic meter, why do you not take the ambient light reading with the meter also as it would give a more accurate reading than the camera meter I think? Thanks. Russ.
More accurate? Possibly. Faster? Possibly not. Convenient? Not in my book… Whatever gets the job done is OK by me Russ.
Hi, Don’t want to be confrontational but how can it not be faster when with the camera you have to get the ambient light then walk to the model to get a flash exposure then walk back to your shoot position. With the meter you stand at the model who is the important part of the image take an ambient reading (should be more accurate than via the camera meter) set it in camera take flash reading, set in flash, walk to shoot position take image, job done with accuracy. And as my dad who used to work on a place you have been to a few times (Palace Pier) used to say “If a jobs worth doing it’s worth doing well”. Russ
Just a general compliment on your work. As a new photographer just this year, I may not learn things as fast as younger photographers as I have come to it quite late in life. However I find your approach to be extremely helpful and your videos quite inspirational in terms of getting me to think of options that are not immediately obvious. So a big thank you.