Four ways to use a polarising filter
A polarising filter is one of the few filters I still own and more importantly use on a regular basis. It was also the first type of filter that I ever bought but that was way back when I first started photography 25 years ago. Since then the humble polarising filter has hardly changed at all, in fact the only real difference is that there’s now two types; linear polarisers (for film cameras) and circular polarisers (for digital cameras).
If you’ve ever used a polariser then you’ll already know how they work. Assuming you have the screw on variety you simply attach it to the front of the lens, look through the viewfinder and rotate the polarising filter until you see the desired effect. What you see is what you get. So here’s four great uses for a filter that every photographer should own.
1. Deep blue skies
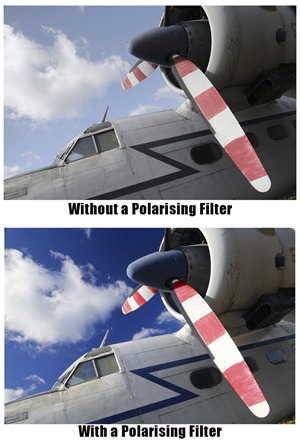
OK, so this is the bread and butter effect of the polarising filter and the reason most people own one. Back in the days before digital if you wanted super saturated colours or the deepest blue skies in your photos, a polarising filter was your best option. Obviously Photoshop has changed things somewhat but it’s still a great thing to do.
It works like this. On a sunny day find a view point that’s 90 degrees to the sun. In other words you want the sun on your shoulder. At that angle you’ll get the maximum polarising effect and your sky will be a gorgeous deep blue colour. The effect is far less intense with the sun behind you and non-existent when shooting towards the sun.
Get it right and you’ll be rewarded with great colours straight out of the camera.
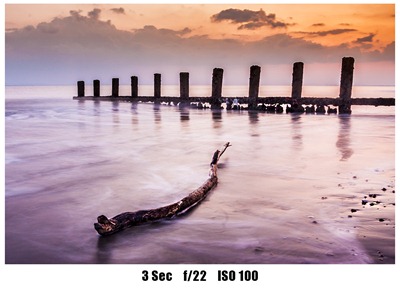
2. Long exposure  Polarising filters are dark just like a pair of sunglasses. In camera terms they usually reduce your exposure by 2 or 3 stops of light and if you’re shooting in aperture priority mode that can sometime cause issues with camera shake as your shutter speed will be 1/4 or even 1/8th its usual value.
Now on a sunny day that probably won’t be a problem but on a dull day or during the evening, you can use this exposure loss “problem” to your advantage.
Let’s say your exposure is ½ sec, f/22 at ISO 100. Adding a polarising filter will drop that to 4 sec, f/22 at ISO 100 and that’s the kind of long exposure speed that can add creative blur to your images. OK it’s not as effective as a really dark neutral density filter but in the right lighting it works brilliantly.
3. Less reflections
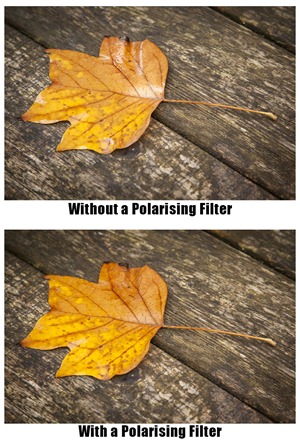
When photographing shiny or wet surfaces you’ll often get colours that look washed out or unwanted hot spots of bright light. That’s when it’s time to reach for the polarising filter.
It may take a bit of careful positioning but when you get it right the polarising filter can drastically reduce or even remove the surface glare from things like roads, water and even wet leaves. The end result is an instant increase in contrast, punchy colours and far better photos.
Now you may be thinking that you could do the same thing in Photoshop so why bother with the polarising filter. Well if you shoot RAW then something like the recovery slider or the new highlights slider can help reduce glare but nothing beats getting it right in camera.
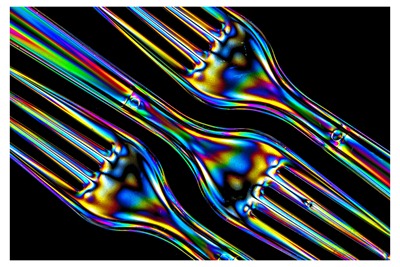
4. Cross polarised photos  It’s a little known fact that most LCD screens, like computer monitors, produce polarised light. Does that matter? Well no, not usually. However that fact becomes very useful when you get the urge to be creative with you camera without leaving your computer.
Simply create a blank white document in Photoshop and then press F a couple of times to leave just the image on screen. Then press CTRL and + key to zoom in on the image, until your screen is filled with white.
Now take anything that’s made of clear plastic such as disposable cutlery and hold it in front of the computer screen. Look through the cameras viewfinder whilst rotating the polarising filter until you see the background go jet black. Press the shutter!


Brilliant, thanks for the post.
Regarding #3 I never thought about using it for leaves and such, only reflections on cars and watches, etc…
And I didn’t know about #4.
I think you should also show an example for shooting through a car’s window or windshield.
Thanks for that Gavin, I use methods 1 and 3 regularly. I need to work on 2. However 4 I hadn’t heard of before but here is my first attempt.
http://www.flickr.com/photos/gaseousclay1/8099684719/in/photostream/lightbox/
I photograph watches and clocks and I couldn’t live without my polariser now. Just a slight turn of the ring and you can see how shadow and light areas travel across a black product. Essential for when I photograph watch elements, like black leather straps.
nice Gav, just bought 50mm 1,4 with polarizer, i am going to try the last one, never heard of that one before. tim jonas (Norway)
Hey Gavin, years ago I used to have a polarising filter and now I have a variable ND filter. Can you explain the difference?
Of the four things listed here an ND filter only does the long exposure… But it does it REALLY well.
Thanks Gavin
Thanks for this Gavin. Think I might put the filter back in the camera bag. As previous thought they were a waste of space as I could never see any difference. I will give it another go.
I’d wish I lived in the UK (London) to be able to attend all your seminar and training sessions. You have the best photography tutorials. Thanks for sharing your knowledge with us. Regards – Oscar
HI GAVIN
NOW THE EVENINGS ARE GETTING LONGER HAVE TO GIVE YOUR LESSONS A GO LOOKS GOOD OFF TO GET SOME AUTUMN SHOTS ON SAT
Does this work in PSE? I am also ion a Mac…press F a couple of times??? Thanks
I’m sat in front of a PC, you’re sat in front of a Mac. Perhaps you should give it a go yourself and share your findings with everyone.
Users of PSE may want to try this method. Create a blank white image and save. Place the file into a folder on it’s own (or on your desktop but only if there are no other image files there) Right click the file and select preview. This should open up in ‘Windows Photo Viewer’ now select the Play slide show button. The image will pop up on screen in full screen mode, and as the file was stored in a folder on its own, will display until you hit the ESC key on your keyboard.
Thanks for this Gavin, the rainbow forks have given me a few ideas for a future project…. 🙂