Flash Exposure Compensation
A few weeks back I wrote a blog post about exposure compensation. If you missed it it’s well worth checking out before continuing with this post. It’s very easy to confuse exposure compensation with flash exposure compensation and although they both work on the principle of overriding exposure, flash exposure compensation (or FEC for short) is a little more tricky to master.
 If you’re lucky you’ll have a flash exposure compensation button on your camera. Look for the lightning bolt symbol which differentiates this button from the standard exposure compensation. If there’s no button then you’ll need to dive into the cameras menu to make the adjustment. If you’re using a speedlight then you can make the adjustment directly on it’s LCD panel and you’ll often get a wider range of compensation settings that way too.
It’s all about flash
As the name suggests, flash exposure compensation only affects the flash where as regular exposure compensation effects the ambient light.
Flash photography, also known as strobist photography, has become much simpler recently thanks to the TTL technology built into speedlights. Of course any TTL system is prone to errors from time to time and that’s where flash exposure compensation kicks in. Basically flash exposure compensation tweaks the flash power and produces more or less light to suit your requirements.
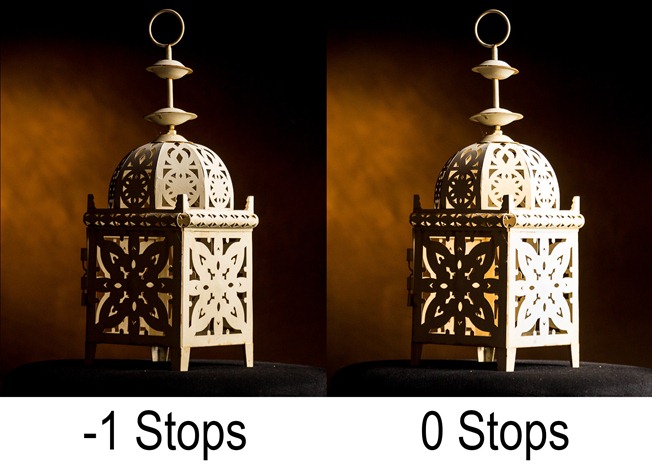
Take a close look at this photo. Left to it’s own devices (photo on the right) the flash produces a little too much light and detail in the metal is lost. By dialling in minus one stop of flash exposure compensation (photo on the left) I retain the all important highlight details.
Compensation in action
If you move the flash exposure compensation to the left (minus numbers) you’re lowering the flash output and your photo will be darker. This is great when you want to do some fill flash photography or when the flash part of the photo is simply too bright.
Moving exposure compensation to the right (plus numbers) makes your flash brighter, perfect for when the flash lit parts of the photo are a little dark, although it should be noted that if your flash was already firing at maximum power adding positive flash exposure compensation will not make it any brighter.
The photos above used off camera flash to light the white lantern from the side, the background was lit by the ambient light in the room. It’s worth noting that changes to the flash exposure compensation made a difference to the lantern but no difference to the background. Look closely and you’ll spot a slight lightening of the background at the +2 stops which is caused by the super bright flash bouncing around in the room and contaminating the background a little.
If you shoot TTL flash, learning how and when to use flash exposure compensation is vital. Once mastered you can get perfect fill flash when shooting outside or use it to get correct exposure when shooting in a studio. Of course you could set your flash to manual only, that way you can avoid the need for flash exposure compensation but you’d have to figure out the correct flash power for each and every shot.


Very interesting to read about this. Indeed it’s kinda hard to master 🙂
Thanks Gavin !
thanks Gavin…. your blogs, posts and videos are amazing learning source for amateur photographers like us…All the best to you in everything you do…
hahaha so funny, yesterday I was watching one of your videos related to the exposure compensation!!! thanks for sharing your knowledge!!! cheers!!!
Thanks,can’t you come to Holland and give some workshops over here??
you’ve got a lot of fans in tulipland!